Castle Rock Coromandel
Just off the 309 Road
- Huge potential - world class quality
- Long routes
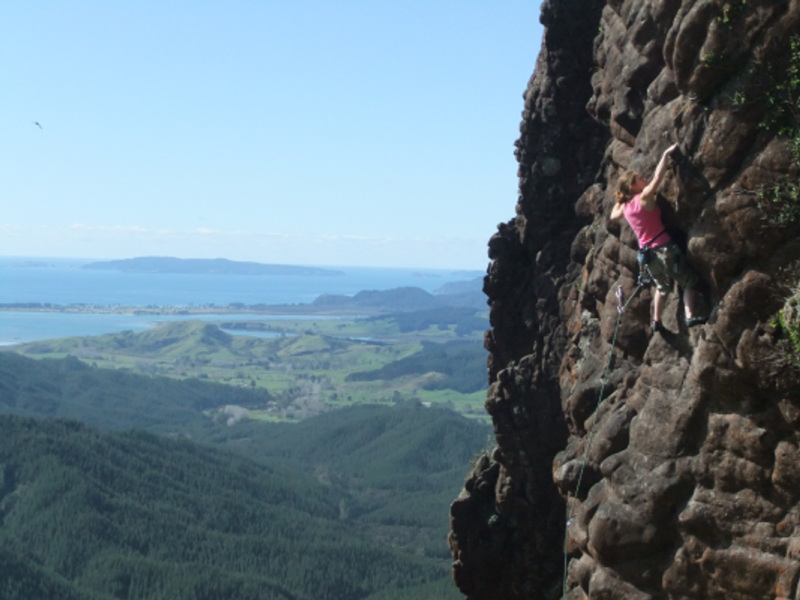
- Fab views
- All sport climbing
- Hip and thigh toning approach!!!
Nice long bolted climbing on beautifully solid rock, but before hurling yourself into this take more care than I would - serious trouble here is easy to come by.
The first time I climbed at Castle Rock my climbing partner and I behaved like complete cowboys, excitedly rapping off any bolts we saw at the tops of the castle rock cliffs. That was one of the many top anchors to non-existent climbs at Castle Rock that we rapped down. We also rapped down a traversing line, the top pitch of an unfinished 5 pitch climb, and couldn't pull the ropes down... oops... blah, blah, blah.... my point being. ... it was fun... just be prepared for something different from anywhere else in the North Island.
A big hug and rainbow colored flowers to all the developers of castle rock - it's a steep walk to take a drill etc - you're awesome!!!
NOTE: New developers please use only stainless steel hardware for new routes. Please try to hide your bolts and consider where your route starts and tops out. Climbers have already added significantly to the erosion at the tops. It's also good practice to keep low profile.
Castle Rock - For non-climbing exploits
How to get to Castle Rock: From Thames
- The "309" road (yes 309 is the name of the road) is about 3km south of Coromandel Township
- Driving North from Thames for about an hour
- Turn right at the 309 road and the sign to the Waiau Waterworks, (3km before Coromandel)
- When you see the Waiau Waterworks, take the next left on CASTLE ROCK ROAD
- Drive 3 or so km up the castle rock forestry road to the top.
- Just after the road curls off to the right - you can park on the right side of the road
- You'll be able to see the rock from here
- The walking track is a little overgrown at the start. Go into the bush, at the big corner, and take the little track going straight up to the summit not the long overgrown road curling off to the right
- Go up the walking track in the native bush. The steep walk takes about 25-40 mins up, and 20 down.
- At the top there's a fork in the track. Most of the climbing is on the left, but check out the view on the right cliff - you'll get a great view of the Budda wall. Try to ignore all the rap bolts on the right spur - They have mostly been placed for developers scoping out new lines. Even on the left side of the left summit there are some random top bolts leading to nothing!!
NOTE: Hide any valuables: From the top you'll have a nice view of dirty crim's breaking into your car. Also, be aware that people cruise the 309 road looking for cars to tamper with. By the way, there's a cool piece of grass at the bottom of the castle rock road, next to a little river, where you can camp. If you need to take a dump the next morning the Waiau waterworks have a nice long drop outside their place which they are usually fine with people using, rather than the icky "dump" issues that end up rubbishing beautiful camp-sites.
Take 2 60 meter-ropes (50's can be dangerous here, and about 20 draws and tie knots in the ends of your ropes.
Castle Rock - From North
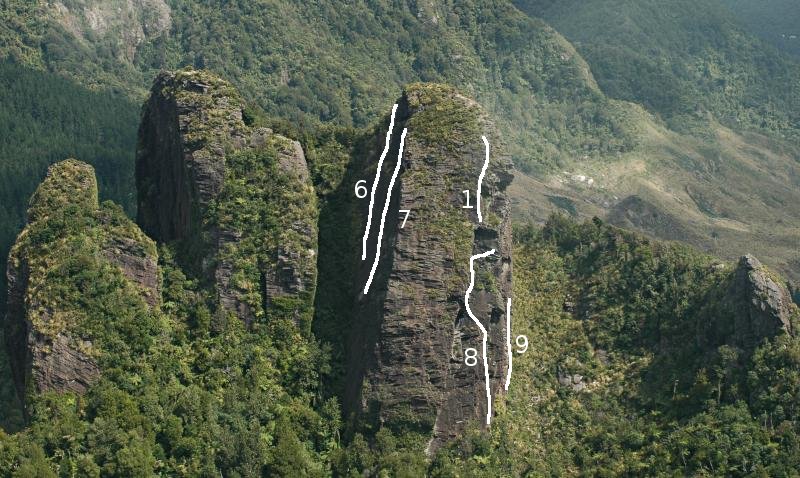
The North Facing Wall: Budda Wall
To get to the top of the climbs here you turn left at the fork in the path to go to the left summit. About 10 meters up on the path at a little rocky step, look right and you'll see a rap station. This is the top of Ganesh. There's an extra bolt on the left bank to help give you strength to get to the rap station if you don't fancy leaning out. It's a 70 odd metre drop if you slip. All climbs have rap stations of 2 or more rings.6: Ganesh (17) 50 meters.
Abseil to a ledge with rap rings. 15 bolts.
There are 3 lines on this face - all slabs, all require rapping in and climbing out - I've also seen someone lower their partner down, to climb out on top-rope, which might be wiser for some.
On the other side of the cliff, walking more towards the left summit you will find another rap station, quietly hiding on the right. This will connect you to 2 climbs side by side. Carefully step down to the abseil station and rap down. Those alpine shrubs hook the rope - you wont be able to pull it down if this happens, so rap down the short top pitch before committing to rappel the rest of the climb. After pulling the ropes abseil the rest of the climb - 2 more pitches down.
7: Reclining Budda (23 bottom, 19 mid, 18 top).
Approx 80 meters.
As you look at the cliff these climbs are on the right side and the right one, sharing the rap station is
7: Slinky Malinky 2 pitches. 19, 18
Western Summit - Kookmeyers Wall.
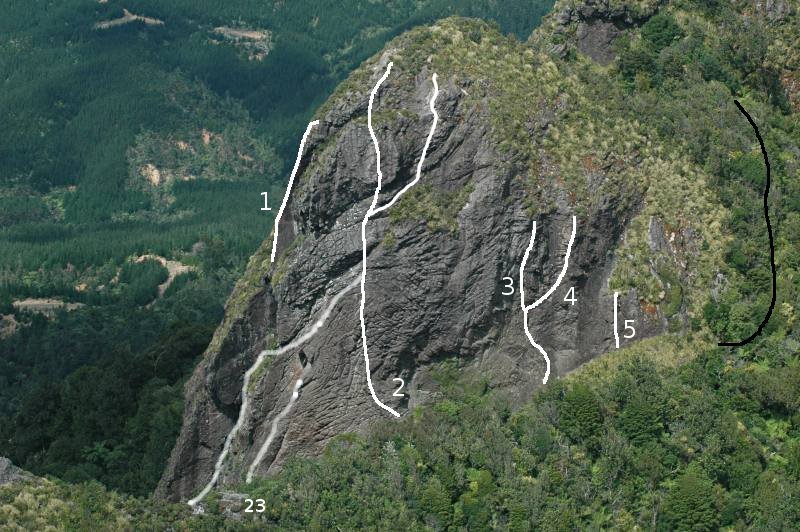
Turn left at the fork in the path near the summit. About a meter on the left there's a hidden path (thank you Ken) veering straight down, hard left - almost back the way you just walked up! Slip and stumble down and curl right to end up at the base of a very nice wall of up to 120 metres. The first climb you come to is an open project of unknown grade - this is the very short wall on the right side of the cliff - Perhaps 12 meters. It has 3 bolts and may need another between 1st and 3rd.
NOTES:
- The next 4 climbs are all just under 30 meters, so bring the right rope/s!
- If it has been raining in the last 3 days some climbs on this wall may still be dripping wet
- In Summer this wall is cool till about 12/1pm, Winter it's lovely after midday.
- These climbs can be climbed ground up, unlike many of the other routes at Castle Rock
Kookmeyers: Right to Left
5: Open Project
Short 10M face with 3 bolts, but not lots of holds.
4: Nice Touch Wilbur (18)
Superb, only it is often dripping many days after rain. Bring 16 draws. Up and right after 4th bolt, extend 4th and 7th quickdraws to avoid drag later on. (27 meters).
3: Wilbur's Cousin (19)
Shares first 4/5 bolts with Wilbur and then veers left. Bring a long draw to extend 3rd - 5th bolts and bolt 10 and 11. A phenomenal route, just a few problems with rope drag if you don't extend draws - the bolts are in the best places for the most solid rock. Bring around 14-16 draws.
2: Wind-dancer (20)
A fine line. Go up the left veering ramp and look for the bolts on the left. The 3rd bolt can create drag - it makes the rope catch on a rock that creates serious drag later on and extending doesn't help: A single biner will pull the rope away from the jutting annoyance. This climb has a sting in middle and the tail.
Wind-dancer has now got options above it. Right now the steepest second pitch is a closed project - please respect this - also know that often the bolting on these closed projects have not been finished
Extending above Wind-dancer there is a connection route of about grade 18 up to 2 (+1 the closed one) routes. This connection route goes up and through a little overlap and then either stay going up or veer hard right to a lovely little 18. If you go straight up. The first climb, the most left veers right to left. Left Foot Dancer (20) is a burly little overhanging number - all the holds are there though. Bring about 12 draws and it ends at a double bolt anchor still below the very top, so you'll have to bring up your second and then convince them to lead up the easy ground to the very top top
OR, after finishing Wind-dancer and starting up the next section, veer right after the little overlap to the next route. Here's the description....
After Wind-dancer, start up the first part of the next climb, which is about grade 18ish - traversing right below the roof (the roof is the closed project) to just above a bunch of cliff growing alpine shrubs. Just above those shrubs are 2 anchors. The following pitch, Ken's grade 18, leads to the top. It's a little run out near the top to get to the anchors, but fairly easy ground.
9: Te Punga (23)
Great on a winter afternoon or summer morning. Just right of the main arete at the bottom of the hill. Fantastic - A hard start followed by a techniques lesson right to the very finish. Very photogenic too. 14 bolts 1 pitch 25 meters. Personally, I cheat clip (aid climb) the second bolt to avoid hitting the rock close by on the ground.
Te Punga - Kookmeyers Wall.
The next climb is around the corner about 10M to the left of Kookmeyers. Getting through the bush to it can be 'interesting'.
8: Sleeping Boy Catches no Fish (18)
Slab climb. 48 metres? (with 2-3 pitches above if you want) Take 2 ropes to get down. This line is great, but run out. NOTE: It doesn't link up with the 15 above it. The crux is getting off the ground. Bring 14 - 16 draws. Line finishes at rap-station at first clump of bushes. I heard that you can flick your ropes to rap off to the right down the 21 arete (Te Punga).
For those who just love traverses.... Above Sleeping Boy catches no fish is a superb adventure of a line called The Lynx Factor (18)
it starts just right of Sleeping Boy and veers slowly around the corner to a nice exposed, but very easy traverse right and when you find yourself above Wind-Dancer it veers upwards and and right through the bushes to the base of Ken's 18 that goes to the top.Above the slab 18 is a grade 15 climb -the climbs do NOT connect.
1: 15 McBirney-Gillman Direct (30 metres (20m +10m rap approach)
Accesible by rapping in from the summit: 2 ropes needed. Start by rapping in from the 3 bolts on the far end/middle of the left summit to the top of the climb. You could walk down there - staying right, but tripping up would mean goodbye cruel world. As you look at the ocean, stay on the right side of the arete for the abseil. If you see a hanger and ring far down to the left (as you look at the sea)- don't go there. You'll see the top of the climb 10m down - 2 ring bolts. Change your rope to these top anchors then go about 20 meters to the belay station situated on a small ledge part way up the cliff. You really need to know what you are doing for this one. Don't send beginners down just because they're doing that grade. Tie a knot in the end of the rope please and bring prussiks/jummars. Crux is the start (and finding the damn climb in the first place)
The next part of Castle Rock will eventually be the MAIN CLIFF - it makes the other cliffs look like pebbles. It's still being developed as yet...
The main cliff is a completly different part of the cliff. You will soon be able to rap down, but please don't try it yet. It's 120 meters, so if you take the wrong line it's tricky to back out. There are many top anchors, but none just yet that will help to get down the whole cliff.How to get to the base of 'THE MAIN CLIFF'. .... start at the bottom near the carpark just right of the ordinary path, go right on the faint path, used to be a road, that starts at the same place. Walk down the hill about 10 minutes, passing a big slip and look for a cairn on the left. There is a well marked bush bash up through the rotting vegetation for about 15 minutes, till you get to the cliff. Turn right. The first climb Quiet Earth is a fantastic climb, with a lot of variation. grade 23. At the top there's one fixed biner - leave it there and rap off that and the ring beside it. I tried to get to the second pitch traversing on the right, but it was a damn scary, so probably needs another bolt or 3. Never assume anything has been finished either. Anyway the pitch after that hasn't been done.
Walk to the right again and pass some bolts, this is probably going to be an aid climb, and go to the base of Cliff's ANZAC parade 120 Metres (19) 25 M, (18) 30 M, (20) 45 M, (18) 30 MI think the 3rd pitch is best if you can do the splits and have very good keeping yourself together skills. Send someone up who knows what they are doing. The crux is getting past the hanging chain and a little above it. There's another much easier crux after the traverse - it's a balancy, barndoor crux - pick the right line of bolts at all times. There's a party ledge at the top of the 3rd pitch, so no more hanging belays. At the very tip top of the final pitch go up and reach far right to the lip
Ken's route up the spike: Duncan's Rock
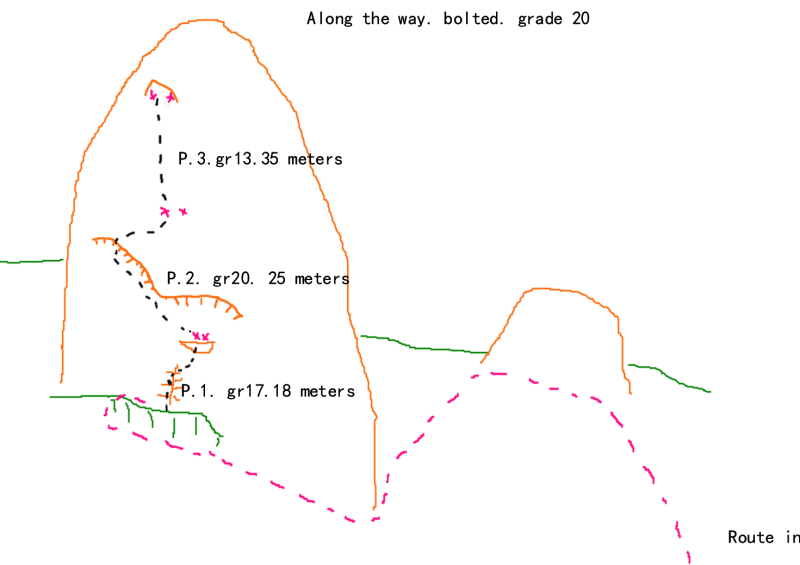
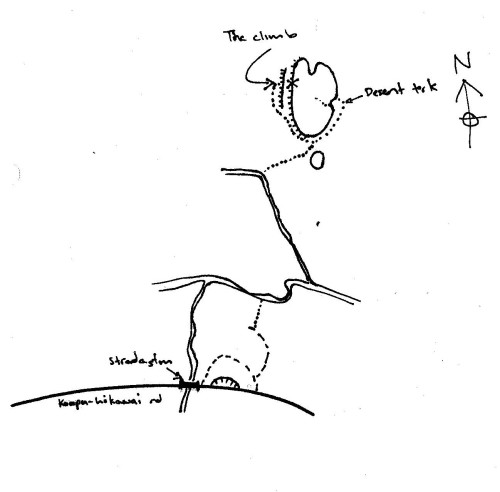
Near the carpark, you can see it from the carpark, the pillar. It's got an interesting approach I hear. Close, but not so easy. I also hear it's about grade 14 and a few bolts. 2 glue-ins at the top. Any more information you'll just have to bash off to find the thing.Another Coromandel climb called ALONG THE WAY- This Kopu-Hikuai road climb has been brought to you by mad Steve
Note: This climb, and approach... and descent, is a seriously adventurous undertaking. A determined attitude will ensure success - please be an experienced climber - bring a GIANT helmet. It looks like there is A LOT of loose rock!How to get to ALONG THE WAY from Thames
Take the Kopu-Hikuai road east. Once you pass the summit of the main range (about 10km's) keep driving downhill, and along a bit - you should see a volcanic plug, to the north. After crossing 2 small (?) bridges the parking area is 200m past the 2nd bridge over STRADA stream (there is a name on the bridge).Follow a 4wd track for 30 metres, passing beehives, and turn right down an old 4wd track for 150m to a clearing where a small path breaks right: Follow this to the river, 100m. At the river (shin deep at worst) follow it down for 100m and you will find a stream running into it from the true left. Follow creek up for 200m and where the stream makes a sharp turn to the left ( looking up the stream) go into the bush. On the bend an indistinct track marked with red tape begins here. It's 30 - 40 minutes to the base of the climb from here. Once you reach the saddle the track drops down and left and follows the bottom of the cliff, this section of track is badly marked and the track is not good. The climb is on the northern/left side of the crag and starts on a ledge about 10m above the tree-line. To identify the bolts of the climb easy access to the ledge can be found 10m left of the base of the climb or by continuing along the base then pushing up through the scrub and dropping back down on to the ledge. Good luck.
Or ignore all that and follow your nose up to the mighty big rock face that you can see straight in front of you from the road - leftish - BE WARNED: The trail can be a tad hard to find.
Along the way, 60ish meters, 3 pitches, grade 17, 20,13.
P1. Up a corner, and then move on to face and up to a ledge.
P2. Left off the ledge and out from under the over hang into a gently overhanging corner. Climb through the over-hanging terrain and then traverse right and up the belay. Look down!
P3.Climb faces and arête to hanging belay on small pinnacle.
Descent: From the summit follow a light track into an unnervingly steep gully - I encourage you to stay firmly on the track. There is a hand line - placed Sept 2009. Or, if you have 2 ropes you can rap the route.
Along the Way - Route Map
Along the Way - Approach
Are you:
Prone to enjoying crashing around lost and confused
A randy old goat
A Bush-bashing explorer
A climber
If you are all of the above take that extra energy of yours and go to castle rock to have some fun.Your Comments:
By the way, there's another area near Hahei, that was developed ages ago. It doesn't have a guide book. Bush bash up to the cliff that you can see from the Cathedral Cove parking lot, through nasty gorse and steep banks of rotting vegetation. When/if you make it to the cliff, near the right side-ish is a lovely crack/corner of about grade 17, which shares the chains with a bolted/trad line of about 19. Take a rack and do the trad line first - at least that way you get to put gear in where you need it.